Wednesday, 2 September 2015

Alloys or refurbed steelies?

The morning after getting back from France this year I noticed our rear right tyre was quite flat. I pumped it up and it held for a day so I took it to the garage. The tyre was fine, it turned out that the steel rim was cracked. This I thought was a perfect opportunity to finally get some alloys (as one of my wheel trims - which were pretty nasty anyway - was missing and my rims looked horrible). However, having only bought new front tyres earlier in the year the timing wasn't perfect. I hate to not get my full value from tyres! Also, with winter coming it didn't seem the most appropriate time to get shiny new alloys.

Having looked into alloys I got more confused then when I first started. Do I stick with 16" or go larger? What colour (although I favour black) and what style etc etc? There are various pros and cons that I'm still getting my head around, but after spending too much time looking into it I decided to take another avenue. I picked up 4 steel rims with tyres for just £40 off ebay.

Caps primed and ready for their black paint
Steelies ready to be fitted

Refurb those rims

Over the years I've read on the forums about people refurbing their steelies and I liked the idea of that. As I mentioned, my steelies are pretty horrible and a bit rusty, but the ones I picked up were ok. So using this page as a guideline, I set about priming and spraying my new steel rims black. Fortunately, my MOT was the following day so I got the garage to swap all the rims and wheels over. With a bit of luck this will look alright for a couple of years.


We are planning to make tyre planters with the left over tyres!

Planters made from old tyres

Alloys for the future

When I do finally go down the alloy route I think I will stick with 16" as I can use one of the old steel rims for the spare, I know it will fit where the spare wheel currently goes under the van and thirdly, according to my mechanic the 16" stand up to a bit more abuse (i.e. potholes and going off-road through fields etc) as they generally have a wider tyre wall. Rimstyle.com seem like a good option in terms of choice and value. But for now we'll see how long the refurbed steelies stay half decent.

Tuesday, 1 September 2015

It's been a while...

In the years since the last post we have been enjoying the fruits of our labours, taking the van across England and Wales, France, Andorra, Spain, Luxemburg, Belgium, Germany and Holland. We've found some amazing places and the freedom the van has given us has been priceless. Last year we spent four weeks driving all round France stopping whenever a place took our fancy, or we were tired. It still amazes me that in Europe you can stop at the majority of campsites on the day (mid summer) and get a pitch. The same can't be said for England, and I know where I would rather holiday!

In that time we've done a few tweaks here and there:

- abandoned the table in the sliding door idea and bought a kiravans door storage, which is pretty good, although we had one of the early models which had an incomplete bottom pocket - I still need to work out what to do with that.

- fitted a kirvans double seat swivel - it's a good bit of kit once you get the knack of swinging it round, which involves opening the passenger door and dropping the handbrake (which is a bit annoying when you've leveled the van on blocks), but see below.

- moved the leisure battery to behind the fridge (as a result of adding the swivel), which is a much better place for it anyway.

- added a Atera Linea bike rack. I ummed and arred whether to get a towbar mounted one (Atera Strada) to allow easy access to the back but a) they were more expensive and b) this one stays on the van meaning it is really quick to chuck the bikes on c) you can still lift the tailgate with a couple of bikes on (after getting the struts uprated) and d) the rack I got was a return so I got an even better deal!


- last week I actually removed the double swivel bench seat and replaced it with a far more comfier single seat. After selling the bench seat with swivel on ebay I was only down £50, which is well worth it in my opinion. I'll be putting in a seat swivel with safe from CMC when it arrives. I'm left with two seat bolt holes on show, but I plan to use something like an elevator bolt or adjustable foot to plug the gap. Photos to follow when the job is done.

The van has also picked up a few scratches and stone chips along the way. I wasn't quite sure how to tackle it effectively but the video below was really helpful. For stone chips I just got the right touch up paint and used a very fine paint brush (rather than the thick brush that comes with the paint) and applied the paint as best I could. I then used 1500 and then 2000 wet sandpaper to smooth it down (a bit nerve-racking the first time you do it, but you can be pretty gung-ho with it) and then used Super Resin Polish and Paint Restorer to bring the paint back up to a nice shine. It's not perfect but it is much better and will prevent rust.

Thursday, 12 April 2012

Gretna Clean and Fenny Bentley

I'd definitely recommend Braids Caravan Park in Gretna. In my wife's words, "it has the cleanest facilities we've ever used at a site". High praise indeed! The site is a 10 min walk from the centre of town (and stumble back) and just a short drive to Gretna Green where the wedding service was - which by the way was short and sweet - nice!

The following weekend we stayed a little closer to home in a CL Site just outside Fenny Bentley. The weather was fab so we had a BBQ, but there are a couple of nice pubs within walking distance too. Also close by are the Tissington and High Peak trails, and Ashbourne, where we managed a quick burst of 5 geocaches.

That rounds up March.

Wednesday, 7 March 2012

Redruth and Llandovery

I realised I haven't posted about the last two trips.

During the last week of January I spent five days in Redruth. I stayed at Radnor Golf Club CL site and it is an ideal base for touring the area. You have access to the clubhouse (small but serves meals and has a licensed bar), and the shower block is fine - although it doesn't open until 8am. I was there to visit some of the Cornish Mining World Heritage Sites, and one of the best, Wheal Peevor, is a five minute walk from the site - well worth a visit.

Mid Feb I stayed at a CL site in Cilycwm, just north of Llandovery. It's a beautiful spot, or so the farmer assured me. I arrived after dark and a mist had gathered by morning. There was no phone or TV reception, so that hints at the remoteness. There is a also a really nice little Forestry Commission Wales site a mile up the road - Cwm Rhaeadr. It has short walks, plus a 4 mile mountain biking single track course. I had an early morning walk around it and saw a Buzzard drinking from a pond. I also came away with some nice wildlife recordings.

Monday, 16 January 2012

Lee Valley Camping and Caravan

Having booked tickets for the Spurs v Wolves game Lee Valley Camping and Caravan site seemed the logical choice for a base. It was £12 (no elec hook up) for one night (me and soon to be 8 year old Benji) and the facilities are very good, especially when you compare it to many CL sites. There's a little shop on site with all the basics. It is also right next to a reservoir and had we had the time we would have had a walk round.

It was a cold night, but the eberspacher heater more than coped - in fact I woke up at midnight and had to turn it down because it was too hot!

In the morning we caught the train from Ponders End down to Tottenham Hale and then the underground (Victoria Line) into London for an all-to-short morning visit to the Science Museum and Hamleys.

It was Benji's first visit to White Hart Lane and we loved it. It was a shame we only drew, but you can't have everything. Wolves parked the bus and we didn't put enough pressure on their keeper.

The best bet for traveling back to the campsite from White Hart Lane is either the train from Northumberland Park to Ponders End (then a 10 minute walk back to Lee Valley) or catch the 279 Bus to Bounces Road and then the W8 service to Lee Valley.

Saturday, 7 January 2012

Start as we mean to go on

Although this post is almost a week late, we saw the new year in next to Spurn Head - the sandy spit at the mouth of the River Humber. The Crown and Anchor pub beside our CL site was perfect for a meal and few quiet beers.

In the morning we drove the 3 miles to the tip of Spurn Head and had a great walk along the shore and through the Marram Grass to circle the only full time lifeboat community in Britain. Luckily the weather was kind - I imagine it can get a bit wild! We didn't see many birds though (it's a nature reserve by the way).


What made this even more special was a) the amazing sunset we had on new year's eve and b) we didn't even know of Spurn Head 48 hours earlier. We just decided spending new year on the east coast was a good way to start the year, and through a process of elimination of available Caravan Club sites we found ourselves there. The site we stayed at was fine, but the toilets didn't pass my daughters stringent test i.e. she peered through the door and said "no!". I have to admire her standards. There are plenty of other sites to choose from when we no doubt return. Although it does make me wonder whether I need to revisit the idea of having our own loo on board.

Friday, 30 December 2011

Reflection on our first year together!

I reckon we have spent over 2 months in the van this year, including six weeks in the summer. It was the perfect home from home when we had major work done on the house, and our awning gave us the extra space we needed.

We haven't done much work on the van during this time; we just wanted to put her to good use. However, the gas locker has been switched 180 degrees (see previous post) and the sink waste goes directly outside now - much better than into a canister. We also topped the main table and work top with a more durable material, as scratches were beginning to show.

The major job was replacing the hinges on the pop top bed. One afternoon the ply base of the bed collapsed on my three kids who were happily watching TV. Fortunately, besides some short-lived shock, there were no injuries!

The gas props, which allow the bed base to lift up providing standing space, excert an incredible amount of force and the hinges used were too narrow. As a result the screws/edge of the ply failed - its worth checking out if you have an austop fitted before summer 2011. My solution was to replace the two hinges with three counter hinges and use bolts rather than screws. A job I finally got round to doing today.

Anyway, the verdict for year one is that the van is fab. We have so many great memories of the places we visited: North and South Wales, Yorkshire, Derbyshire, South London, Cheshire etc. It won't be long before we are back on our travels and I plan to document all the sites we stay at during 2012, plus any tweaks made to the van.

Tuesday, 26 April 2011

First trip with the family

Having used the van a few times on my own, we all went away as a family this Easter for a few days. We couldn't have asked for better weather, and we stayed at 4 great campsites in the Brecon Beacons, Somerset, Dorset and Wiltshire. The last three Caravan Club 'Certified Location' sites.

The trip was a good opportunity to see how the five of us would cope in the van together, and the weather certainly helped us bed in and work out the best way to do things. All in all everything worked out really well. The two boys (3 and 7) slept in the roof, and beside my eldest sliding out one night (we were on a bit of a slope), only to continue sleeping on my daughter in the cab bunk, everyone slept well. Luckily I had put a net across the hole in the pop top, which broke his fall (he ended up face down about 6 inches from the floor!), but it prompted us to add wheel levellers to our shopping list!

The only other real issue was the position of the gas bottle. It lives under the rear seat, but faces the boot so you have to take everything out, and then reach right under, to turn the gas on and off. It seemed like a good idea at the time, and thus far this appears to be the only thing that was ill planned.

As a result I am now going to get the gas locker turned through 180 degrees and an extra door put in the under bed front panel, so access is much easier. There is then no need to leave the van to have a cuppa in the morning - not a problem in the sun, but...

Saturday, 12 March 2011

Sliding door stow away table

Inspired by the Avalanche Surf Bus I wanted to design and build my own stow away table, but attach it to the sliding door instead. I have been working on this for a little while, and whilst it is almost there I will need to rethink my design.

I already have one table which serves the back seats. This one stows away behind the rear frame of the Rib Seats and therefore blocks the frame off when you open the boot.

The stow away table attaches to a swing leg, which itself is stowed down the side of the Rib Seats, and this is to provide a table for the front seats.

I constructed a panel, with a cut-out for the bracket on the back of the table, for the sliding door. This allows the table to fit as flush as possible, but the sliding still does quite fully open without the table rubbing against the wheel arch.

For the table do I:

- use 6mm ply rather than the 9mm I am currently using?
- use aluminium (or similar) which would be thinner

Both these options would pose a new issue of how to attach the swing leg table bracket to the back of the table without bolting right through the table.

Watch this space.

Thursday, 10 March 2011

Power steering pump disaster

Having already cut my timings pretty fine to reach Holyhead and catch the ferry to Dublin for a short trip I was a little disconcerted when I started to hear a whirring sound as I was driving along. I first noticed it when I wound my window down - about the first time all winter.

At first I thought it was the kind of sound the wheels make on some roads, but it was soon apparent that it was the van. I pulled over within 1/2 mile and popped the bonnet to see mineral oil spewing out of the breather hole of the power steering reservoir. I knew my chances of catching the ferry were slim, especially when I realised I had no mobile reception. I jumped back in the van and decided to drive a little further. Although the reception didn't improve and the whirring had turned into a drone, I found one of those little orange SOS phone boxes. Luckily I am an AA member and got through.

After an hours wait, and a brief bit of reception to enable me to delay my ferry crossing (Direct Ferries were really helpful and ended up putting my booking back three times for only a small surcharge) the AA turned up and towed me to Craven Motors in Llandudno Junction. They allowed me to kip in the van on their forecourt overnight (we didn't arrive there until almost 6pm) and promised to look at the van in the morning. Anyway, to cut a long story shorter, the upshot was the pump shaft had literally snapped to the amazement of the garage folk - hence the over pressurised oil. £650(!) and two days later it all seems to be hunky dory again.

The garage rang the VW helpline to ask if they should be looking for any other fault considering the forces that must have taken place. Apparently no. They have sold a few pumps and so it may be a fault that the T5s have.

I read on the T4 forum that if this oil drains into the boots of the steering rack then you are looking at having to replace that too. Fingers crossed.

Saturday, 12 February 2011

Eberspacher and central locking

I had the Eberspacher D2 heater fitted a few weeks ago and its fab. My only gripe is that even though it is fitted under the chassis, beneath the drivers seat, you can still hear the pump 'ticking'. But it's a small cost for toasty warmth.

I ask the fitters (Derby Auto Electrics) to leave the hot air vent dangling out the back of the drivers seat so I could build a shelf in which to mount the vent. I did this today at the same time I fixed the central locking fault which affects loads of T5s. The T4 Forum has a great thread on this.

Anyway, as the driver's seat was out I built a small shelf between the fridge and drivers seat.

Photo (left) shows it looking back with the driver's seat out. You can also see my 'fix' of the central locking cable. It is the cable wrepped in the shiny black insulation tape just where the two air vents come through the floor.

The second photo shows the vent as you look through the side door. The shelf will be used to store one of the tables, plus trays etc.

The veneer chipped off the wood a little bit so its not perfect, but generally I am happy with it.

Sunday, 6 February 2011

I'd always balked at the price people were charging to install the electrics in vans, but after spending 2 solid days doing this very thing, with my step dad, I can appreciate why now. Even more so when you have narrow cupboards to contend with.

Saying all that everything is now up and running exactly as we planned. The charger/distribution unit, inverter and double socket and hidden at the bottom of the wardrobe behind a little access door, along with my hook up cable.

Quite a bit of the electric equipment came off display boards from boat shows, via ebay. I saved about 80% on RRP this way, and being suitable for marine applications, means its more than suitable for the van. The splash proof switch may be a bit excessive (although the kids do make a mess at breakfast) but I have to say alot of the switches on offer aren't very aesthetic. I like the design of ours.

The two cigar lighter sockets were in the van when I bought it, so they get re-used. The switch was from Wilko's!

I think my favourite thing is the battery monitor. It tells you what % the battery is charged at, and also how many amps its using, or if its charging then at what rate. At the moment only the leisure battery is connected, but I'll add the starter battery too. The monitor sits above the fridge so you can open the slide door and check capacity

I've put the switch for the main lights beside the sliding door on the left. This means I can tuck my hand in to the left and switch it on when coming into the van, and at night its within reach, without having to move when in bed.
I 've put 4 LEDs in the roof and another into the pop top, which can only be switched on if the main switch panel is one. This stops the kids turning the light on unless we want them too - ahh the power!

I will soon add a light over the worktop, which can also be used for ambient lighting in the evening.

Friday, 21 January 2011

Electric hook-up

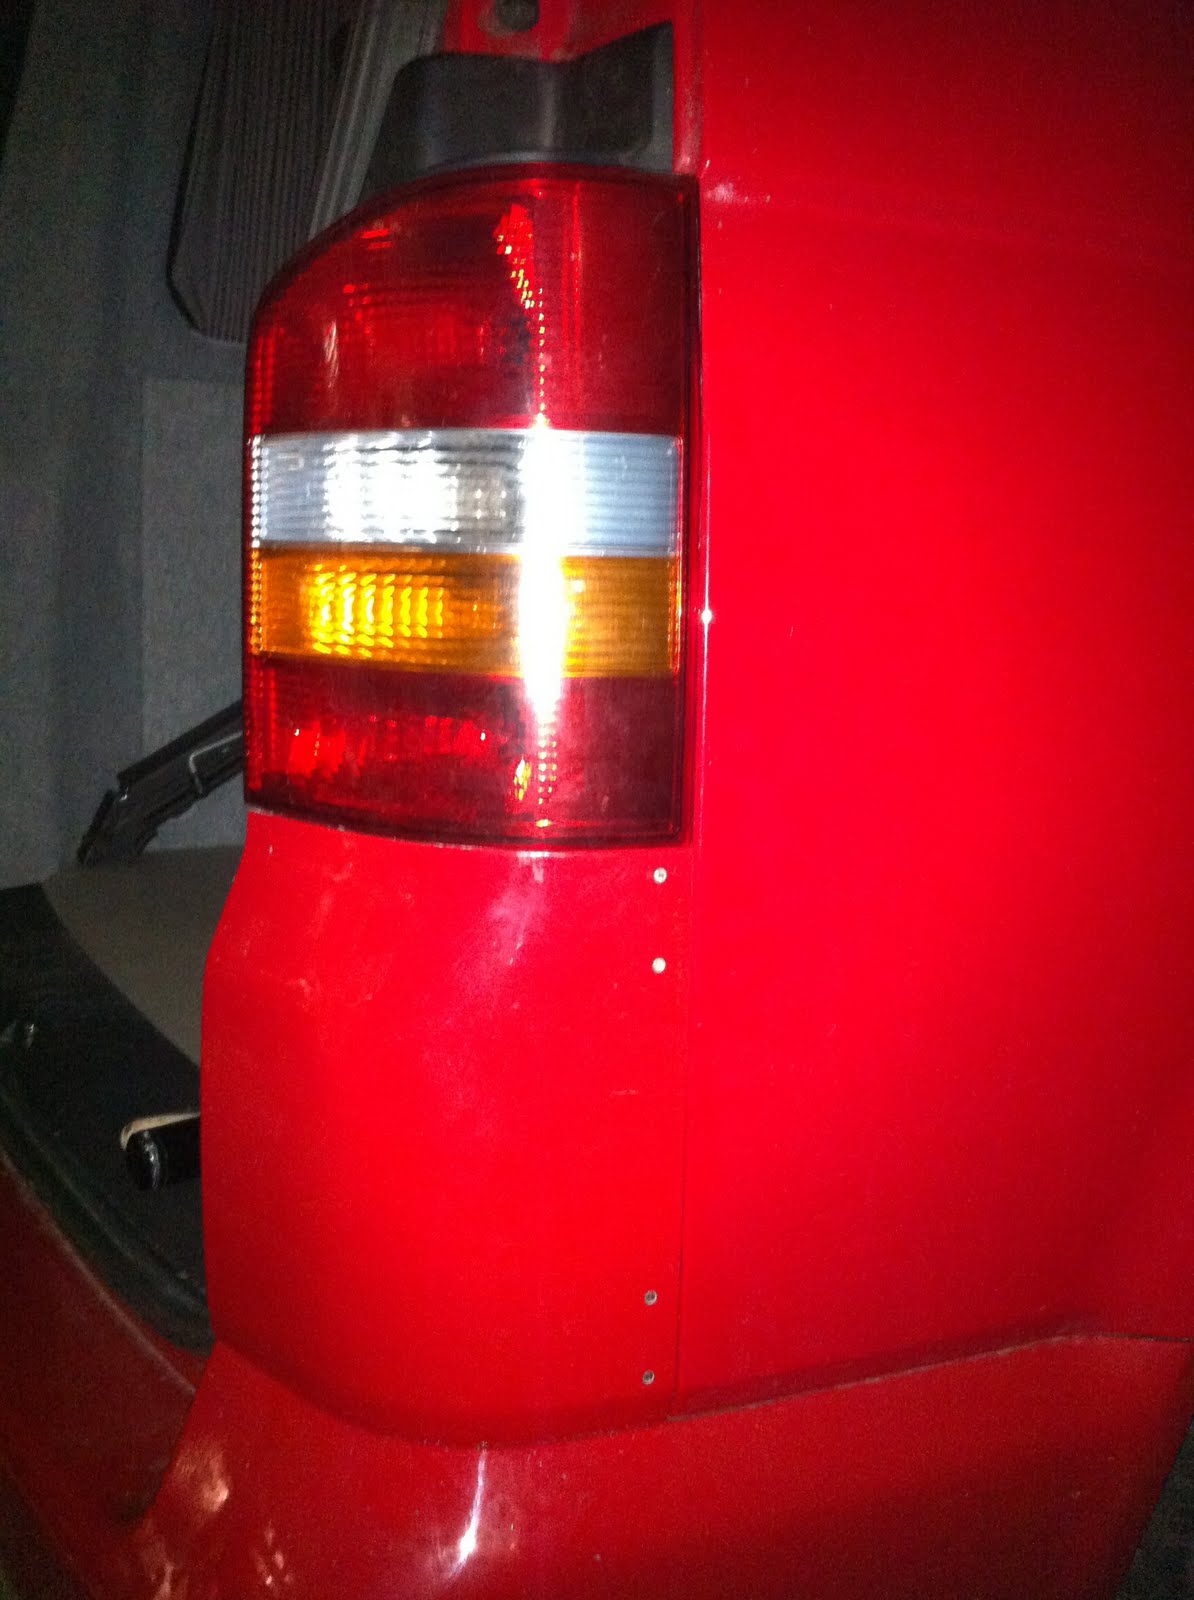
For some reason I have been really looking forward to doing this, having been inspired by the relevant thread on T4 Forum. I was after some nylon hinges to hinge the plastic cover under the offside rear light cluster, but in the end had to plump for some brass hinges; not ideal but I will grease them to aid against rusting. Anyway, having thread the 16amp cable through the grommet that the light cables came through I screwed the male plug (this means there are no live exposed end on the cable you bring to the van) onto the van.

The plastic cover and the plastic casing underneath need to be cut away to allow the hook up to go in. Hopefully the picture will be useful for someone attempting a similar approach.

Being a glue novice (beside pritt stick and super glue) I speculated with using chemical metal, as I had some lying around, to attach the brass hinges to the plastic. Verdict: it doesn't stick to plastic which I had guessed but as it only took 10 mins to set I thought it worth a punt. Next I tried Aruldite. This took about a day to set, kept sliding about and although faired better on the sticking front, was still pretty rubbish. Finally, I opted for bolting through the plastic, something I had hoped to avoid. However the end result, I think, is pretty good. I remembered I had some tiny bolts (about 2.5mm diameter), courtesy of my Father-in-Law, who would have loved to see this van if he was still alive.

This is where the chemical metal came to the fore. The holes in the hinges were too large, but the chemical metal had filled the holes up so I could drill through them and get a tight fit. I countersunk the external side to make the bolt heads flush with the plastic (can you see the four little silver dots on the right hand picture?) I may even touch them up with some red paint to disguise them eventually.

Although bolting through wasn't a preferred option (although better than rivets, which I have seen done) I think I will be able to drive without worrying about the plastic falling off. To aid this I have added a clip by the tailgate to stop the cover swinging open. Jobs a good 'un me thinks. 12v electrics next...

Thursday, 20 January 2011

Furniture fitted

The van is back from 'Convert Your Van' in Sheffield. Scott did a great job, well pleased. My plans for a tambour door on the wardrobe were dashed because the units are too narrow for the roller, but that's a minor thing. Likewise the units over the worktop.


We decided to go for cherry, which may not be everyone's taste, but it gives a real warm glow in the van. Everything has fitted in nicely.

Scott waited for me to arrive before cutting the table as we wanted it full length, allowing the kids to sit and eat at it/play easily. A moment of genius followed whereby the table now butts up against the back of the bed frame when not in use, filling the space perfectly. Pictures to follow at some point. I have another good plan for a second table so will probably post both at the same time.

My step dad is up this weekend to weave his sorcery on the electrics.

Saturday, 1 January 2011

I have now finished the carpeted panels, and fitted curtains, on the drivers side of the van. The Van-X curtains are great and very easy to fit. Rails are attached to the top and bottom of the window frame, with the supplied screws, and studs are attached to the window sides to create a really effective blackout screen.


I also bought some window rubbers, off ebay, to give a good finish to the window edges.

At the back of the van I have fitted a wider rear step, using the black caps from the old cover for two of the holes. I still need to get 2 more but they are about £2.50 each - for a small piece of plastic!

The white and blue box is a battery charger and distribution unit, with the ac power coming from a hook-up socket located behind the offside rear light cluster (which is still to be fitted). The orange 16amp cable is already in position.

The next job is for the furniture to be fitted, by 'Convert your Van' in Sheffield. Then its the electrics. I do wonder whether I should have given more thought to the lighting than I have thus far.

I also think a darker floor would have been a good idea as it shows up muddy footprints very easily.

Wednesday, 1 December 2010

New insulation method?

My plans to finish installing the carpeted panels may have been delayed, but it has heightened my search for a diesel heater. Eberspacher or Webasto? hmmm.

In answer to my first comment (thanks Phil), yes
I have had a 3 seater RIB seat fitted. It is 130cm wide leaving approx 20-25cm for some slim units that will widen behind the drivers seat to fit a fridge. It compares favourably to the rear seat of a Peugeot Partner (our old car) which comfortably fit three child seats (for 6, 5 and 3 year old).

The furniture is going to be fitted by 'Convert Your Van' in Sheffield as they have the right tools and experience to ensure a good finish, I hope!

The front passenger seat is currently a folding bench seat; the folding back allows easy access into the pop top. But I think we will upgrade to captains seats at some point as I question the comfort of the bench seat on long journeys - something I can only dream about at the moment.

Friday, 19 November 2010

3D images (day and night)

As I was writing my last post, the 3D images I have been waiting for arrived. Cheers Sandeep!

All being well this is a damned good mock-up of how the van should look when its all done...

Rib seats


The van can now function as a family vehicle! Had the Rib Altair seats fitted by vw-interiors last weekend, and it looks fab. Originally, we were going to go for the standard inka fabric but fortunately I had a change of mind and went for 'Safari Noir' (Black!) and it was the right choice, personally.


One thing I have noticed is that these seats are really deep and my three year olds feet, in particular, don't hang over the edge; instead the mud he will invariably plaster himself in will give our new fabric a real hint of safari. I think we need one of those fitted plastic covers the Americans seem to love for their sofas - I never have really worked that one out!

Under the seat you will also notice a black steel gas bottle locker, bought from GT Campers. Dan (at vw-interiors) fitted this for a small labour charge; I can't bring myself to drill holes in her myself.

I just need to finish off the rest of the insulation and carpeting...

Interior side panel carpets - part 1

It's taken me 9 days to find the time to post this, so here it is...

I chose Megavanmats 'silver' carpet for the interior due to all the good reviews. It is nice and thick and although it was about 6 degrees C when I was sticking this in it was still pretty pliable, although a hairdryer to warm it up makes all the difference.

To acclimatise myself I started off with the cards (re- using the factory fitted hardboard one for the smaller card on the pillar, and 6mm ply for the one above the wheel arch). Cut the carpet - I used sharp scissors as the stanley-type knife I had, although new, was rubbish at cutting - about 50mm wider than the card, lay the carpet on a flat surface, spray the glue on both surfaces and stick 'em together. Creases shouldn't really be a problem, but if they are they can be easily smoothed out. Glue the back side edges of the card (I wish I had bought some brush on adhesive rather than just spray, for exactly this sort of situation) and glue the carpet edges back. Where the carpet ruffles up, pinch the edges and do a tight cut with a pair of sharp scissors - simples!

Feeling brave I attempted the whole of the nearside in one go, including the wheel arch (having never tried this before but buoyed by what I have read on the T4 forum), and I am pretty pleased with the results. So long as you take your time you should do a pretty good job. Having said that, if I had attempted this ten years ago in my early twenties I would no doubt have rushed and bodged it up completely.

The wheel arches are actually very pleasurable to do, although cutting around the floor edge can be tricky. The window wasn't too difficult. Cut a 'X' in the carpet where the window is to allow the carpet to stretch into the crevices, then fold the carpet around the metal. The finish is pretty good but I still think I will try and find some aftermarket rubbers to put around the edge to give a professional finish.

I then cracked on with the wheel arch on the other side so it wouldn't be a major hassle after the Rib seat was fitted.

Sunday, 7 November 2010

Poptop, windows, bumpers and floor

Picked up my van from James at Custom Campers (Halifax) after 10 days of separation, and it was worth the wait. The van now looks like a camper having had windows and an Austops elevated roof fitted, plus colour-coded bumpers - when I left James I wanted to drive down the road and sit on my horn, well chuffed!


With little need to generate any enthusiasm I set to work this morning with the aim of getting the floor down permanently. I cut some strips of 6mm ply and stuck them down in the non-ridged areas of the floor pan to make an even base. I also ran a piece of conduit (with some wire already in) across the van (the white strip in the middle of the photo), as I have a plan I may put into action later on - if I don't then nothing is lost. I only thought about taking the photo (left) after getting the floor in, hopefully the weight of the floor has bonded the strip that is sticking up.

Before I put the floor in I laid it over a 2.55m x 2m piece of Altro industrial vinyl, which I got from Andy Rowe (top bloke) in Clay Cross, Derbyshire, and marked out the shape of the floor. His top tip was to cut off an extra 1mm (or so) from every edge so the floor doesn't bubble up - worked a treat!

I also marked on the floor where the 6mm ply battens were so I could screw them down, although a) I am not sure how effective this was and b) how necessary it will be as the floor will be bolted down with the Rib seat etc.

Although Andy said the floor didn't need to be stuck down I used a bit of Megavanmat adhesive, and wished I hadn't. Trying to get large piece of Altro into the camper without it bonding as soon as it touched the floor was bloody annoying, but I got there in the end.

I went for an almost beige vinyl, which I was a bit unsure about, but it looks more grey now its in. I need to sort out how to finish the edge by the tailgate, but otherwise it looks great.

Today, I also fitted the rest of the RAAMmat onto the panels in readiness for the carpet installation. All being well she will be going to VW Interiors next weekend to have the Rib seat fitted, so I need to get the nearside carpeting done in the next few days.