Wednesday 1 December 2010

New insulation method?

My plans to finish installing the carpeted panels may have been delayed, but it has heightened my search for a diesel heater. Eberspacher or Webasto? hmmm.

In answer to my first comment (thanks Phil), yes
I have had a 3 seater RIB seat fitted. It is 130cm wide leaving approx 20-25cm for some slim units that will widen behind the drivers seat to fit a fridge. It compares favourably to the rear seat of a Peugeot Partner (our old car) which comfortably fit three child seats (for 6, 5 and 3 year old).

The furniture is going to be fitted by 'Convert Your Van' in Sheffield as they have the right tools and experience to ensure a good finish, I hope!

The front passenger seat is currently a folding bench seat; the folding back allows easy access into the pop top. But I think we will upgrade to captains seats at some point as I question the comfort of the bench seat on long journeys - something I can only dream about at the moment.

Friday 19 November 2010

3D images (day and night)

As I was writing my last post, the 3D images I have been waiting for arrived. Cheers Sandeep!

All being well this is a damned good mock-up of how the van should look when its all done...

Rib seats


The van can now function as a family vehicle! Had the Rib Altair seats fitted by vw-interiors last weekend, and it looks fab. Originally, we were going to go for the standard inka fabric but fortunately I had a change of mind and went for 'Safari Noir' (Black!) and it was the right choice, personally.


One thing I have noticed is that these seats are really deep and my three year olds feet, in particular, don't hang over the edge; instead the mud he will invariably plaster himself in will give our new fabric a real hint of safari. I think we need one of those fitted plastic covers the Americans seem to love for their sofas - I never have really worked that one out!

Under the seat you will also notice a black steel gas bottle locker, bought from GT Campers. Dan (at vw-interiors) fitted this for a small labour charge; I can't bring myself to drill holes in her myself.

I just need to finish off the rest of the insulation and carpeting...

Interior side panel carpets - part 1

It's taken me 9 days to find the time to post this, so here it is...

I chose Megavanmats 'silver' carpet for the interior due to all the good reviews. It is nice and thick and although it was about 6 degrees C when I was sticking this in it was still pretty pliable, although a hairdryer to warm it up makes all the difference.

To acclimatise myself I started off with the cards (re- using the factory fitted hardboard one for the smaller card on the pillar, and 6mm ply for the one above the wheel arch). Cut the carpet - I used sharp scissors as the stanley-type knife I had, although new, was rubbish at cutting - about 50mm wider than the card, lay the carpet on a flat surface, spray the glue on both surfaces and stick 'em together. Creases shouldn't really be a problem, but if they are they can be easily smoothed out. Glue the back side edges of the card (I wish I had bought some brush on adhesive rather than just spray, for exactly this sort of situation) and glue the carpet edges back. Where the carpet ruffles up, pinch the edges and do a tight cut with a pair of sharp scissors - simples!

Feeling brave I attempted the whole of the nearside in one go, including the wheel arch (having never tried this before but buoyed by what I have read on the T4 forum), and I am pretty pleased with the results. So long as you take your time you should do a pretty good job. Having said that, if I had attempted this ten years ago in my early twenties I would no doubt have rushed and bodged it up completely.

The wheel arches are actually very pleasurable to do, although cutting around the floor edge can be tricky. The window wasn't too difficult. Cut a 'X' in the carpet where the window is to allow the carpet to stretch into the crevices, then fold the carpet around the metal. The finish is pretty good but I still think I will try and find some aftermarket rubbers to put around the edge to give a professional finish.

I then cracked on with the wheel arch on the other side so it wouldn't be a major hassle after the Rib seat was fitted.

Sunday 7 November 2010

Poptop, windows, bumpers and floor

Picked up my van from James at Custom Campers (Halifax) after 10 days of separation, and it was worth the wait. The van now looks like a camper having had windows and an Austops elevated roof fitted, plus colour-coded bumpers - when I left James I wanted to drive down the road and sit on my horn, well chuffed!


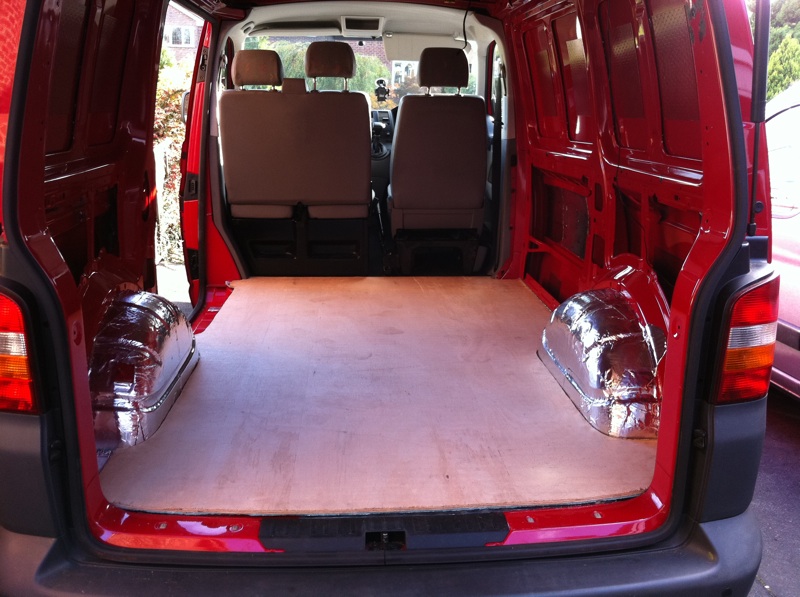
With little need to generate any enthusiasm I set to work this morning with the aim of getting the floor down permanently. I cut some strips of 6mm ply and stuck them down in the non-ridged areas of the floor pan to make an even base. I also ran a piece of conduit (with some wire already in) across the van (the white strip in the middle of the photo), as I have a plan I may put into action later on - if I don't then nothing is lost. I only thought about taking the photo (left) after getting the floor in, hopefully the weight of the floor has bonded the strip that is sticking up.

Before I put the floor in I laid it over a 2.55m x 2m piece of Altro industrial vinyl, which I got from Andy Rowe (top bloke) in Clay Cross, Derbyshire, and marked out the shape of the floor. His top tip was to cut off an extra 1mm (or so) from every edge so the floor doesn't bubble up - worked a treat!

I also marked on the floor where the 6mm ply battens were so I could screw them down, although a) I am not sure how effective this was and b) how necessary it will be as the floor will be bolted down with the Rib seat etc.

Although Andy said the floor didn't need to be stuck down I used a bit of Megavanmat adhesive, and wished I hadn't. Trying to get large piece of Altro into the camper without it bonding as soon as it touched the floor was bloody annoying, but I got there in the end.

I went for an almost beige vinyl, which I was a bit unsure about, but it looks more grey now its in. I need to sort out how to finish the edge by the tailgate, but otherwise it looks great.

Today, I also fitted the rest of the RAAMmat onto the panels in readiness for the carpet installation. All being well she will be going to VW Interiors next weekend to have the Rib seat fitted, so I need to get the nearside carpeting done in the next few days.

Sunday 24 October 2010

New floor

Having been distracted by the need for a new starter battery, I finally got round to temporarily fitting my new floor before it goes off to have a pop top, windows and colour-coded bumpers.


Having rust treated a few holes in the chassis, I thoroughly cleaned the back of the van to get rid of any grease. Then it was time to cover the whole of the rear floor with a layer of sound deadener. I found that if I laid the RAAMmat across the raised bits and then eased it into the ridges with the rubber handle of a claw hammer it worked really well and reduced the amount of creases. It is really pliable, can be cut with normal scissors and doesn't cut your fingers at all (apparently Damplifier Pro does?). I saved the wheel arches until last and I am pretty pleased with the results. In any case both will be carpeted, and the off side arch will be covered by furniture and the near side one will be under the Rib bed/seat. I used about 2 1/2 15"x 15" pieces of RAMMmat for the arches and nearly a whole pack (20 sheets) for the floor. The rest will go on the side panels and the tailgate.

Next job was to cut a template of the floor using the EZ Cool automotive insulation. Its 4 foot wide so I used two pieces. I then laid this over a 5' x 10' sheet of 9mm ply and drew around it. I used the larger sheet as I wanted the floor in one piece, however I realised a 5' sheet isn't quite wide enough (a 4" x 6" ish piece is missing behind the near side rear wheel arch), but I'll just make it up from an off cut. I used a jigsaw to cut around the shape and it was pretty much bob on, bar a few little bits here and there that needed shaving off.


The EZ Cool was stuck to the underside of the ply (which the adhesive from Megavanmats) and the new floor was slid into place, and hey presto I should hopefully have a quieter ride up to Custom Campers in Halifax, for the new roof etc. Before the floor is fitted permanently I am going to put down some small ply pieces in strategic places to ensure the floor doesn't bend anywhere and so it can be screwed to something to keep it flapping at the edges etc.

Friday 8 October 2010

Bulk head frame removal

I was a little nervous taking a grinder to the van (the pop top and windows are being done by professionals) but that was the only way the bulkhead frame was coming out. There is a great description of what needs to be done here on the T4 forum.

It took about an hour and a half to do, although the van is chocked up on the drive with no handbrake or seats still! As the front seats had to come out I stripped out the remaining leisure circuit and took the opportunity to remove and clean the rubber mat, and slap on some RAAMmat sound deadener (the silver coloured stuff on the wheel arch). I used the rubber handle of the hammer to work it into the metal. Before the rubber mat goes back in I am going to put a layer of EZ Cool (automotive thermal bubble wrap) underneath. This acts as both an insulator and sound barrier - so they say!

I'll also be using RAAMmat (which was incredibly easy to cut using normal scissors) and EZ Cool, plus a bit of space blanket for insulating the rear of the van next month

Monday 4 October 2010

Taking it back to the metal

Picked up my SWB T5 this weekend. In her previous life she provided the wheels for the Transport for London bus stop cleaners.

After a couple of months of web browsing (the T4 forum has been brilliant) its time to put theory into practise.

My first job was to strip everything out so she looked pretty much like she did when she left the factory. The rear was lined in chipboard (riveted in place) and the floor was stuck down with blobs of no more nails (damn that stuff), although heating it up with a hairdryer and using a scraper got rid of most of it. I'm hoping a thinner of some sort will do the rest. I've noticed some screw holes through the chassis and wheel arches too. There isn't really any rust so I just plan to Hammerite those and use a bit of liquid metal to fill the holes. On the other side I will seal with a bit of silicon, probably.

I have had some bonus finds too: The van had rear parking sensors retrofitted and a leisure battery under the passenger seat, which powered some lights and cigarette lighter sockets in the back. Hopefully I can reuse the sockets later in the build. The hardboard cards were also in good nick too. I can't decide whether I will carpet these or buy some 4 or 6mm ply and carpet them instead.

The van was stripped out in about 4 hours, but I have already made my first mistake (which I only realised next day). I naively believed the van had a split charge relay, therefore the starter battery would not go flat if I used the lights running off the leisure battery. Wrong! My eagerness to strip everything out meant I worked well after the sun went down, and in the morning when I went to move her she was dead as a dodo. The jump leads are now kept under the front passenger seat! It does mean my rather excessive 300amp BEP VSR will be fitted very soon. This model, which I got for a bargain on ebay, has a manual override so the leisure battery can actually be used to start the engine if the vehicle battery is flat. More to come on that later.

Besides removing the bulkhead frame, which requires a grinder and an 8mm spline head socket head to undo the seat belt catches, filling the few screw holes and giving her a good clean down she is almost as good as new(ish), and very red!

The kids dust pan and brush has come in very handy keeping everything tidy too!